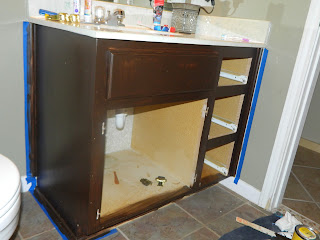
I got the stain at Sherwin Williams for about $16, I am using the Minwax Gel Stain in Walnut. To apply the stain all you need is cheap foam brushes. BEWARE this stuff is thick, sticky and a horrible pain in the butt to get off your hands so try and stay as clean as you can. Also DO NOT try and wash your brushes because that will become a HORRIBLE mess, trust me I know from first hand experience. See photo below which was taken after 3 scrubbing sessions. Should you get it on you, and you will at least a little bit, use some exfoliating soap so the scrubbers in it can rub this stuff off.
Ok so back to the how to stuff, remove the doors and drawers and sand them and the cabinet base down. Use fine grit sandpaper or a sanding block. You don't need to sand them very much at all but doing it just a little bit will help the stain stick even better. I used my power sander because it makes the process easy and more fun lol. Wipe everything you just sanded down with a wet rag to get off all the dust. While those dry pop open the stain and start stirring it up with a stir stick. Like I said before this stuff is REALLY thick and on first use it will be a pain to stir since the can is full but just keep at it. It should be smooth and creamy but I wasn't able to get it that way until after I had done my first coat and and more stirring room in the bucket so get it as close as you can.
Whenever you are ready grab your foam brush and start slappin some stain on. The goal on the first coat is just to get some basic coverage. Start with the the middle part if your doors are like mine and have an inner panel. You want to make sure you don't leave any globs anywhere so smooth out any crevices to get out the excess. Always stain in the direction of the grain on the wood and make sure to finish all strokes from the top to the bottom. This means don't stop in the middle of the wood because it will leave a thick line of stain there. You can start your stroke in the middle though so you don't get a thick layer only at the top. The first coat will not be even and will look a little scary but it will look a million times better after the second coat. This is all the parts after their first coating.
Now here's the part where it starts looking more like a finished product and a lot less scary. Dry time in between coats needs to be at least 8 hours and you do not need to sand between each coat.
I think the magic number for these to be perfect was three because here they are after the third coat looking BEAUTIFUL!!!!!!!!!
I LOVE my new modern bathroom that is now COMPLETELY different from anyone else's around. In the end I spent a little more than $20 on this project only because I bought a hog's hair brush from Sherwin Williams to use for the poly which was $7.50. I went $10 over budget BUT I have enough of everything left to be able to do our second bathroom as well so split that $30 between both bathrooms and then I actually came in under by 5 bucks :) Here's the break down of supplies:
Minwax Gel Stain in Walnut $15 (I bought the large can and only used half, the $8 would be enough for one bathroom)
Minwax Fast Drying Polyurethane $6 (8 oz can)
Staining brush $7.50
Package of foam brushes (I got a 12 pack of various sizes for $1.50 in the paint department at Walmart)
Stir stick for mixing the stain


It looks beautiful! i love it :)
ReplyDelete