Friday, September 28, 2012

DIY Gone Batty Tree

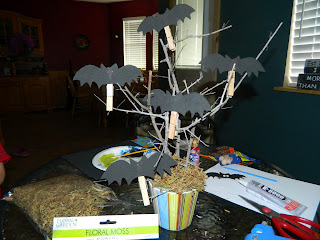
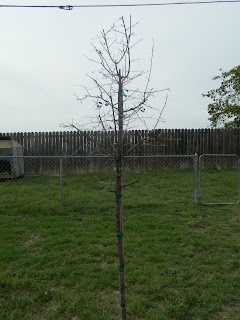
This bat tree was a HUGE hit when I pinned the original idea I found, let's see if mine can be a hit too. This is a pretty easy project but beware when breaking branches off your dead tree in the backyard because dead branches cause much more damage when you scrape up yours arms and hands with them. It only took 3 band aides to cover my wounds :( This is the dead tree in my backyard that wasn't giving up any branches without a fight, as you will see at the end I won though bwhahaha.
Soooo now that I have defeated the tree moving on to supplies. You need a black foam sheet, small pot or vase, small styrofoam (in whatever shape and size will fit your pot), bat template, some clothespins, hot glue and some kind of moss.
Start by tracing or cutting out some bats from the foam in whatever way seems to work for you. I used a small craft razor knife I had and it worked perfect.

Put your foam piece in your pot or vase. Mine fit very snug but if yours is a little loose fitting just put some glue around the sides before you shove it in there.
Now carefully shove in your branches making sure to have them arranged exactly how you want them as you put them in so you don't break down the styrofoam to much. I had one that I twisted around to much so I just filled the hole in with some glue to hold the branch in place better.
Now hot glue your bats to the ends of some clothespins and clip them to your tree. Cover the top of the styrofoam with some hot glue and place chunks of moss on it. Make sure to do this in sections so your glue doesn't start to dry and so your moss stays in chunks and doesn't start falling apart.
Oh and I added some red eyes to the bats with a drop of paint. Enjoy!
 
Cost breakdown:
$1 for the pot
$1 for the styrofoam
$1 for the clothespins
Branches (3 band aides were used to get them)
$1 for the foam
$1 for the moss

BOO!!!!

This is a super cute and easy project that can be done with ANY letters and the decorating possibilities are endless.

Start with unfinished wood letters that you can find at a craft store. Mine are the 9 1/4 inch letters from Hobby Lobby.
 
Trace each letter out on the back side of your scrapbook paper
cut the letter out and break out the.....
best invention ever lol. Apply a thin coat of mod podge to the front of the letter. Place your paper on top and smooth it out. Put a coat of mod podge over the top of the paper. If you have any areas where you have a little paper hanging over the edges no worries once it's dry use a sanding block and just sand the edges of the letter down. Cut some ribbon to attach the letters together and you can either tie them together or do as I did which was make a loop and hot glue the ribbon together.  
I am going to be adding some cute foam ghosts to it as well but you can add anything you want to it.

My First Yarn Wreath (Halloween themed)


This is another one of those projects that I just winged it and had no clue what I was doing until it was done. This is my first wreath of any kind and I really loved the clean look of the yarn wreaths so that's the kind I decided to make. I started with a foam wreath and a bundle of yarn. I tied the end of the yarn to the wreath and then just started wrapping. This seriously took TWO HOURS to wrap and was very boring but I was beyond happy to have it done. I had some purple tulle left over from another random project that I thought would look great with the green but I couldn't figure out how to make it into something and attach it. I finally decided to try my hand at making a tulle pom pom (I'll do a tutorial on one of those later). The pom pom can out perfect so I tied that on and hot glued a shiny skull in the middle. The letters were cut out of foam left from the Monster Squad project and then hot glued on. I had some bugs left over from my front door project (also doing that tutorial later) so I hot glued those and some googly eyes on and bing bang boom my yarn wreath looks super cute.

The Monster Squad

I don't really have much of a tutorial on this one because I just kind of went with it and wasn't sure what I was doing until it was done but you'll get the drift. I originally saw the idea here http://www.keepingitsimplecrafts.com/2011/09/spooktacular-2x4-halloween-characters.html

I started with a pallet and just cut boards out between the middle and side support runners. 
I sure do love when I get to use my power tools ;)
and once your done with the cuts you will have the pieces that when put together will look something like this.
From this point on is where I kind of got caught up in the moment and didn't get any more pics until it was just about complete so I'll just explain how it got from this to.......
THIS! I painted each board with acrylic craft paint on all sides. Next I used a pencil to draw on the faces (no template for this just made it up as I went along). Once I was happy with the pencil drawing I used more craft paint to paint on the faces and details. I then used some appropriately sized screws and screwed each board from the back side through to the front black board. Make sure your screws are long enough to go into both boards without puncturing through the front. I cut strings of yarn and braided them together for the witches' hair. The braids and the bangs were glued to the top of the board using hot glue. Her hat I blindly cut from a piece of craft foam, it has two pieces for the front and back. I glued the front of the hat in place with hot glue, then lined up the back and glued it down too. Once the front and back of the hat were in place and lined up I ran some hot glue around any edges that I could pinch together and close up. For the pumpkin I cut some leaves off of a fake flower bundle and glued them on, I added a tree branch chunk for a stem at the top to but haven't taken a pic since I put it on. For the final step I made some puff paint letters like I did in my "Speak your mind with blocks" tutorial. Those along with some scrapbook paper were mod podged onto the base board and ta da! my monster fam bam is complete.
 

Thursday, September 27, 2012

DIY Halloween Gumball Machine

One of the first 10 things I pinned on pinterest was a tutorial on how to make a faux gumball machine. I thought it was the cutest thing but could never find the supplies anywhere in Germany. I got everything to make two of them about a month ago for my kiddos but kept putting it off for bigger projects around the house. Today was the day though, I only have one done but will be doing the second tomorrow and decided since it was so close to halloween I make go ahead and make them halloween themed. First off list of supplies:

Really good glue (after reading reviews I went with E6000 because it's industrial strength and good for everything)
Small glass bowl
Small terra cotta pot with base
Any kind of decorative finale for the top
Paint and any other decorations you want on it

Not seeing how this will become a gumball machine,
you see it now huh.
 
Next step is paint, painting the pot and base anyway that you want. I used regular acrylic paints and basic brushes.
Now glue you glass bowl to the upside down pot. Make sure to put enough for a good seal but not to much to pour over the sides. Also glue on the finale on the lid. DO NOT glue the lid itself on!! You should be able to lift the lid and use it as a candy dish so you don't want that part glued down.
Add any final touches and voila you have a cute gumball machine candy dish. The more I stare at this the more I want to add some neon green hair to the underside of the lid and a witch's eyes and mouth to the glass bowl....what do you think?
 
Total project cost:
Terra cotta pot with base $2.50
Paint $1
Ribbon $1
Finale $1.50(for a 4 pack)
Glass bowl $1
 
$7 for all the supplies


I've been a busy little bee getting ready for Halloween

I have spent the last few weeks scanning shelfs, comparing prices and then finally buying all the supplies I needed to complete some awesome halloween crafties. My mind was flooded with ideas on what I actually wanted to make from the 50+ things I had pinned on pinterest. Since I couldn't afford to make them all I narrowed my list down to about 15 (which was still way to many but I just couldn't help myself lol). I am super proud to announce that I have officially completed 7 of my 15 projects and it's not even Oct yet :) I am making pages for each project so you can see how each one was done and a cost breakdown as well. I will work on those pages tomorrow while the kiddos are in school but for now here's an overview of what I've been working on for the last two weeks.


This is another project that I have in the works but thanks to a certain puppy of mine that has a strange love for eating feathers it is to be continued.

He's an oddball but we sure do love him

Tuesday, September 25, 2012

Refinding my mojo

I have been in the most craptastic funk lately and I am trying to so hard to get out of it but this sucks! My husband is beyond amazing and my kids are two of the best in the world so it is for sure not them. The problem is this PCS we did. Moving from Germany to Texas has been the hardest thing we have ever done financially and mentally. Our spirits are high and we are happy to be here but t...
he way this has ruined our bank account is crushing me daily. I have put in over 30 job applications and only got one call back which was for a job I didn't get. I lost all my scentsy customers and have yet to find a single new one here. I don't normally vent like this especially not here but I know alot of us are in this same boat so I know most of you won't mind a bit. If my rare whining does bother you I apologize. Whew it felt good to get that out and now I am going to go to my little corner of the livingroom and work on some super cute Halloween crafts and let my mind slip away to lala land. If you made it through reading this whole post thank you for listening and you are a true friend so thanks for that too. :)
 
It felt so good to get back to crafting tonight, it's definately helping me feel a thousand times better. I have made several halloween craft projects in the last few days so tomorrow expect to see this page flooded with some super cute stuff. Until then check out this super cute and simple wreath from Infarrantly Creative http://networkedblogs.com/CC7bd
 

Friday, September 14, 2012

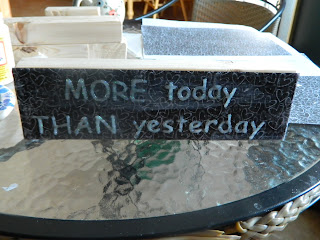
Speak your mind with blocks

Hey guess what.........I made another pin!!!! LOL gee imagine that. So here's where I originally saw it  http://www.etsy.com/listing/98474533/personalized-wedding-giftdecoration and now let's make our own. OH by the way this project happily includes the use of POWER TOOLS!!! Woohoo!! I don't have a fancy Circuit (yet) and after trying to hunt for sticker letters I just couldn't find ones that I liked that I could get in both black and white. Solution was to make my own letters using the ideas I got from a few other pins on pinterest. The letters I used are made using puff paints on wax paper but if have a circuit you can make them from vinyl or if you find some letter stickers you can use those too. If your going the puff paint method print out your saying in the font style and size (I used size 85 font) you want to use. Here's the supplies you'll need minus the 2x4 needed to cut the wood blocks from.
White and black fabric puff paints
2 sheets of scrapbook paper
Wax paper
Mod podge
Icing spatula
Foam Brush
1/2 of a 2x4 or similar wood

Place the wax paper over your printer paper and use the paints to trace the words. Make sure to make them good and thick so they with be easier to remove later. Let dry for several hours or overnight. Oh btw thankfully my husband quickly noticed I used the wrong year so I did have to redo the last numbers and make a 03 lol.
Use an icing spatula or something similar to carefully scrape the words up from the wax paper. Be patient while doing this. The puff paints letters are stretchy and flexible which makes the fairly easy to work with but still be cautious not to tear any but if you do it's easy to make more of course :)

Now go break out that circular saw and go cut out your blocks. Yipee! The bottom block I am using is 12" long, middle one is 10" and top one is 3 1/2". I cut the 10" block down the middle horizontally so that each piece was 10"x 2". Be very careful doing this, it's done best with a table saw but I don't have one of those (yet) so I very cautiously used my circ.
Cut your scrapbook paper the size of each block that you are going to be using it on. Place a layer of mod podge on the block, then place the paper on top of that. make sure you rub that paper down good and press it on there leaving no air bubbles.

Put another layer of Mod Podge on the top of your scrapbook paper and now attach your puff paint letters. Mog podge dries clear so it will leave a smooth shiny finish when it's done. It also dries quickly so make sure you apply more thin layers if your letters don't seem to be sticking well. Press your letters down to secure them.
Now continue on with creating all your blocks in the same way.
I used glitter white puff paint because I already had it on hand but it dried a little clear so it wasn't looking as good as it would have if I had used regular white. The heart I used has special meaning because my husband (who is an aspiring tattoo artist) actually tattooed that same heart on my ankle. It was his first tattoo he did on someone other than himself using the tattoo gun I bought him for Christmas.  Makes this even more special <3
To make it look better (and not have to redo over half of it) I decided to bust our some craft paint and just paint my glitter puff letters white. It was pretty easy to do but once again had I used regular white instead of getting fancy with the glitter it would have been great from the beginning lol.

A thousand times better and now it's officially complete. I do plan on making another block to put a picture on like the original but that will come after I print one out. What special symbol would you use in making a sign like this? Why is it special to you?
Wednesday, September 12, 2012

Bye bye ugly cookie cutter cabinets for under $20

 
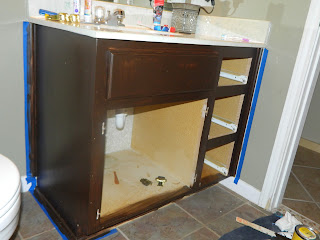
I HATE that pretty much every house in my neighborhood probably has the exact same cabinets as I do. Builder's grade cabinets are not usually made of real wood or at least not any kind of good wood so you can't usually just strip them and re stain them. Most people paint to get rid of the cookie cutter look but I wasn't that was something I really wasn't loving the idea of doing. After some research I found the perfect way to customize my bathroom without spending tons of money ripping out the existing cabinets and putting brand new ones in. GEL STAIN is the key! Gel stain is thick like pudding (seriously it's just like chocolate pudding) so it's actually easier to control and manipulate than a regular stain is. It can also be used on builder's grade cabinets with little to no sanding. I was so scared to actually do this because if it turned out horrible I did not have the funds to replace the entire sink and cabinet but curiosity got the best of me so here I go. Here's my boring bathroom before the makeover.
 

I got the stain at Sherwin Williams for about $16, I am using the Minwax Gel Stain in Walnut. To apply the stain all you need is cheap foam brushes. BEWARE this stuff is thick, sticky and a horrible pain in the butt to get off your hands so try and stay as clean as you can. Also DO NOT try and wash your brushes because that will become a HORRIBLE mess, trust me I know from first hand experience. See photo below which was taken after 3 scrubbing sessions. Should you get it on you, and you will at least a little bit, use some exfoliating soap so the scrubbers in it can rub this stuff off.
Ok so back to the how to stuff, remove the doors and drawers and sand them and the cabinet base down. Use fine grit sandpaper or a sanding block. You don't need to sand them very much at all but doing it just a little bit will help the stain stick even better. I used my power sander because it makes the process easy and more fun lol. Wipe everything you just sanded down with a wet rag to get off all the dust. While those dry pop open the stain and start stirring it up with a stir stick. Like I said before this stuff is REALLY thick and on first use it will be a pain to stir since the can is full but just keep at it. It should be smooth and creamy but I wasn't able to get it that way until after I had done my first coat and and more stirring room in the bucket so get it as close as you can.
Whenever you are ready grab your foam brush and start slappin some stain on. The goal on the first coat is just to get some basic coverage. Start with the the middle part if your doors are like mine and have an inner panel. You want to make sure you don't leave any globs anywhere so smooth out any crevices to get out the excess. Always stain in the direction of the grain on the wood and make sure to finish all strokes from the top to the bottom. This means don't stop in the middle of the wood because it will leave a thick line of stain there. You can start your stroke in the middle though so you don't get a thick layer only at the top. The first coat will not be even and will look a little scary but it will look a million times better after the second coat. This is all the parts after their first coating.


Now here's the part where it starts looking more like a finished product and a lot less scary. Dry time in between coats needs to be at least 8 hours and you do not need to sand between each coat.

 
 I think the magic number for these to be perfect was three because here they are after the third coat looking BEAUTIFUL!!!!!!!!!

 
Now let's put it together and what got bippity boppity......HOLY CRAP THAT'S GORGEOUS!!!!!! In honor of this event I even purchased a new shower curtain from Kohl's for $20. I also added a thin layer of polyurethane so it got some shine and extra sealant since this is my kids bathroom. The small can of poly was only $6 and I have plenty left. The only thing that sucks about poly is that whatever you use it on needs to remain untouched for 24 hours after your done applying any and all coats you put on.


I LOVE my new modern bathroom that is now COMPLETELY different from anyone else's around. In the end I spent a little more than $20 on this project only because I bought a hog's hair brush from Sherwin Williams to use for the poly which was $7.50. I went $10 over budget BUT I have enough of everything left to be able to do our second bathroom as well so split that $30 between both bathrooms and then I actually came in under by 5 bucks :) Here's the break down of supplies:

Minwax Gel Stain in Walnut $15 (I bought the large can and only used half, the $8 would be enough for one bathroom)
Minwax Fast Drying Polyurethane $6 (8 oz can)
Staining brush $7.50
Package of foam brushes (I got a 12 pack of various sizes for $1.50 in the paint department at Walmart)
Stir stick for mixing the stain